Over the past few years at Eternalight, our team worked across multiple mobile projects where the brief sounded simple on paper: build and ship an iOS and Android app without doubling the engineering effort.
After discussing with many mobile app developers, the reality is cluttered. Along the way, we picked up a few things that follow the reliability factor in apps.
Those are patterns, structure decisions, deployment routines, and a general sense of what actually works.
These problems are never resolved, and they are often encountered in the development world. The reason is not the complexity of the tech stack, but small technical twigs need to be fixed on time.
Beyond just a step-by-step React Native app development tutorial guide, this blog post is a practical implementation in the real world. Sharing the chunks of learning comes from experience.
To keep things structured, this write-up is split into two halves:
1. Why companies build for both iOS and Android, native vs hybrid trade-offs, and where React Native fits
2. Project structure, packages, Android keystore setup, iOS archival, environment handling, and CodePush
Why Companies Build Apps for Both iOS and Android?
One question comes up often when working with founders: “Do we need both apps right now?”
From what we’ve seen across Eternalight’s client work, the answer is almost always yes. Users live in different ecosystems, and ignoring one inevitably limits reach.
- In India and other emerging markets, Android is dominant.
- In the US, Europe, and parts of East Asia, iOS owns the premium audience.
- Products in fintech, health, productivity, transport, commerce, and social need presence on both platforms to stay competitive.
In practical terms, going dual-platform helps companies:
- Access the broadest possible user base
- No need to rely on one coding environment
- Improve engagement and retention
- Control the UX far more than a mobile web app can
Thus, when users split across iOS and Android, sticking with a single version may impact engagement. Even early-stage startups now prefer shipping at least a basic version on both stores. It’s worth to build iOS and Android app version using React Native for a company's growth beyond its imagination.
Native Apps: Advantages and Disadvantages
Before choosing React Native for most Eternalight projects, we compared what pure native development actually means. Native apps can attract users, but we can’t neglect their trade-offs.
Advantages of Going Fully Native
- Consistent, predictable performance
- Immediate access to the latest platform APIs
- Strong compatibility with camera, maps, Bluetooth, and hardware layers
- Smooth animations and UI transitions
Disadvantages of Native Development
- Two separate codebases
- Two developers or teams
- Higher cost and slower development cycles
- Every feature has to be built twice
- Twice the testing, twice the maintenance burden
Native app development for iOS and Android separately is best when you can stretch the budget without any burden and have intellectual minds to shape it up. However, as the days pass, it becomes difficult to manage the regular progress, and it becomes a tech blocker.
For businesses that need to move fast, this is often where the conversation shifts toward hybrid frameworks.
Why We Prefer React Native at Eternalight Infotech?
React Native lands in a sweet spot for most product teams: fast development, near-native performance, and a shared JavaScript/TypeScript codebase.
In our experience, React Native works well when:
- The app relies heavily on UI and API-driven screens
- The team wants to ship features quickly
- Budget, timeline, or staffing constraints exist
- The product is evolving fast, especially in early-stage cycles
- Over-the-air updates are valuable
When Native Still Makes More Sense?
React Native isn’t the best fit for:
- Heavy multimedia editing
- High-end gaming
- Low-latency hardware integrations
- Deep, platform-specific capability
- Certain offline-first encrypted storage patterns
But most apps fall into a middle zone where React Native covers around 90% of the requirements, and a few native modules fill the rest.
How React Native Outperforms Other Hybrid Platforms to Build Apps for iOS and Android?
We’ve evaluated Flutter, Ionic, and Xamarin on various projects. They each have strengths, but React Native tends to better align with real-world constraints for building iOS and Android apps.
Why React Native Often Feels More Practical?
- Uses JavaScript/TypeScript—languages most teams already know
- Mature ecosystem: React Navigation, Zustand/Redux, Reanimated
- Strong community support and issue resolution
- Easy hiring compared to other ecosystems
- CodePush enables near-instant UI updates
- Plays nicely with design systems and custom components
- Integrates more naturally with native modules when needed
Flutter is solid, but the Dart adoption curve, larger binary sizes, and a custom rendering engine don’t always align with business priorities.
Part 1: The Project Structure We Use at Eternalight
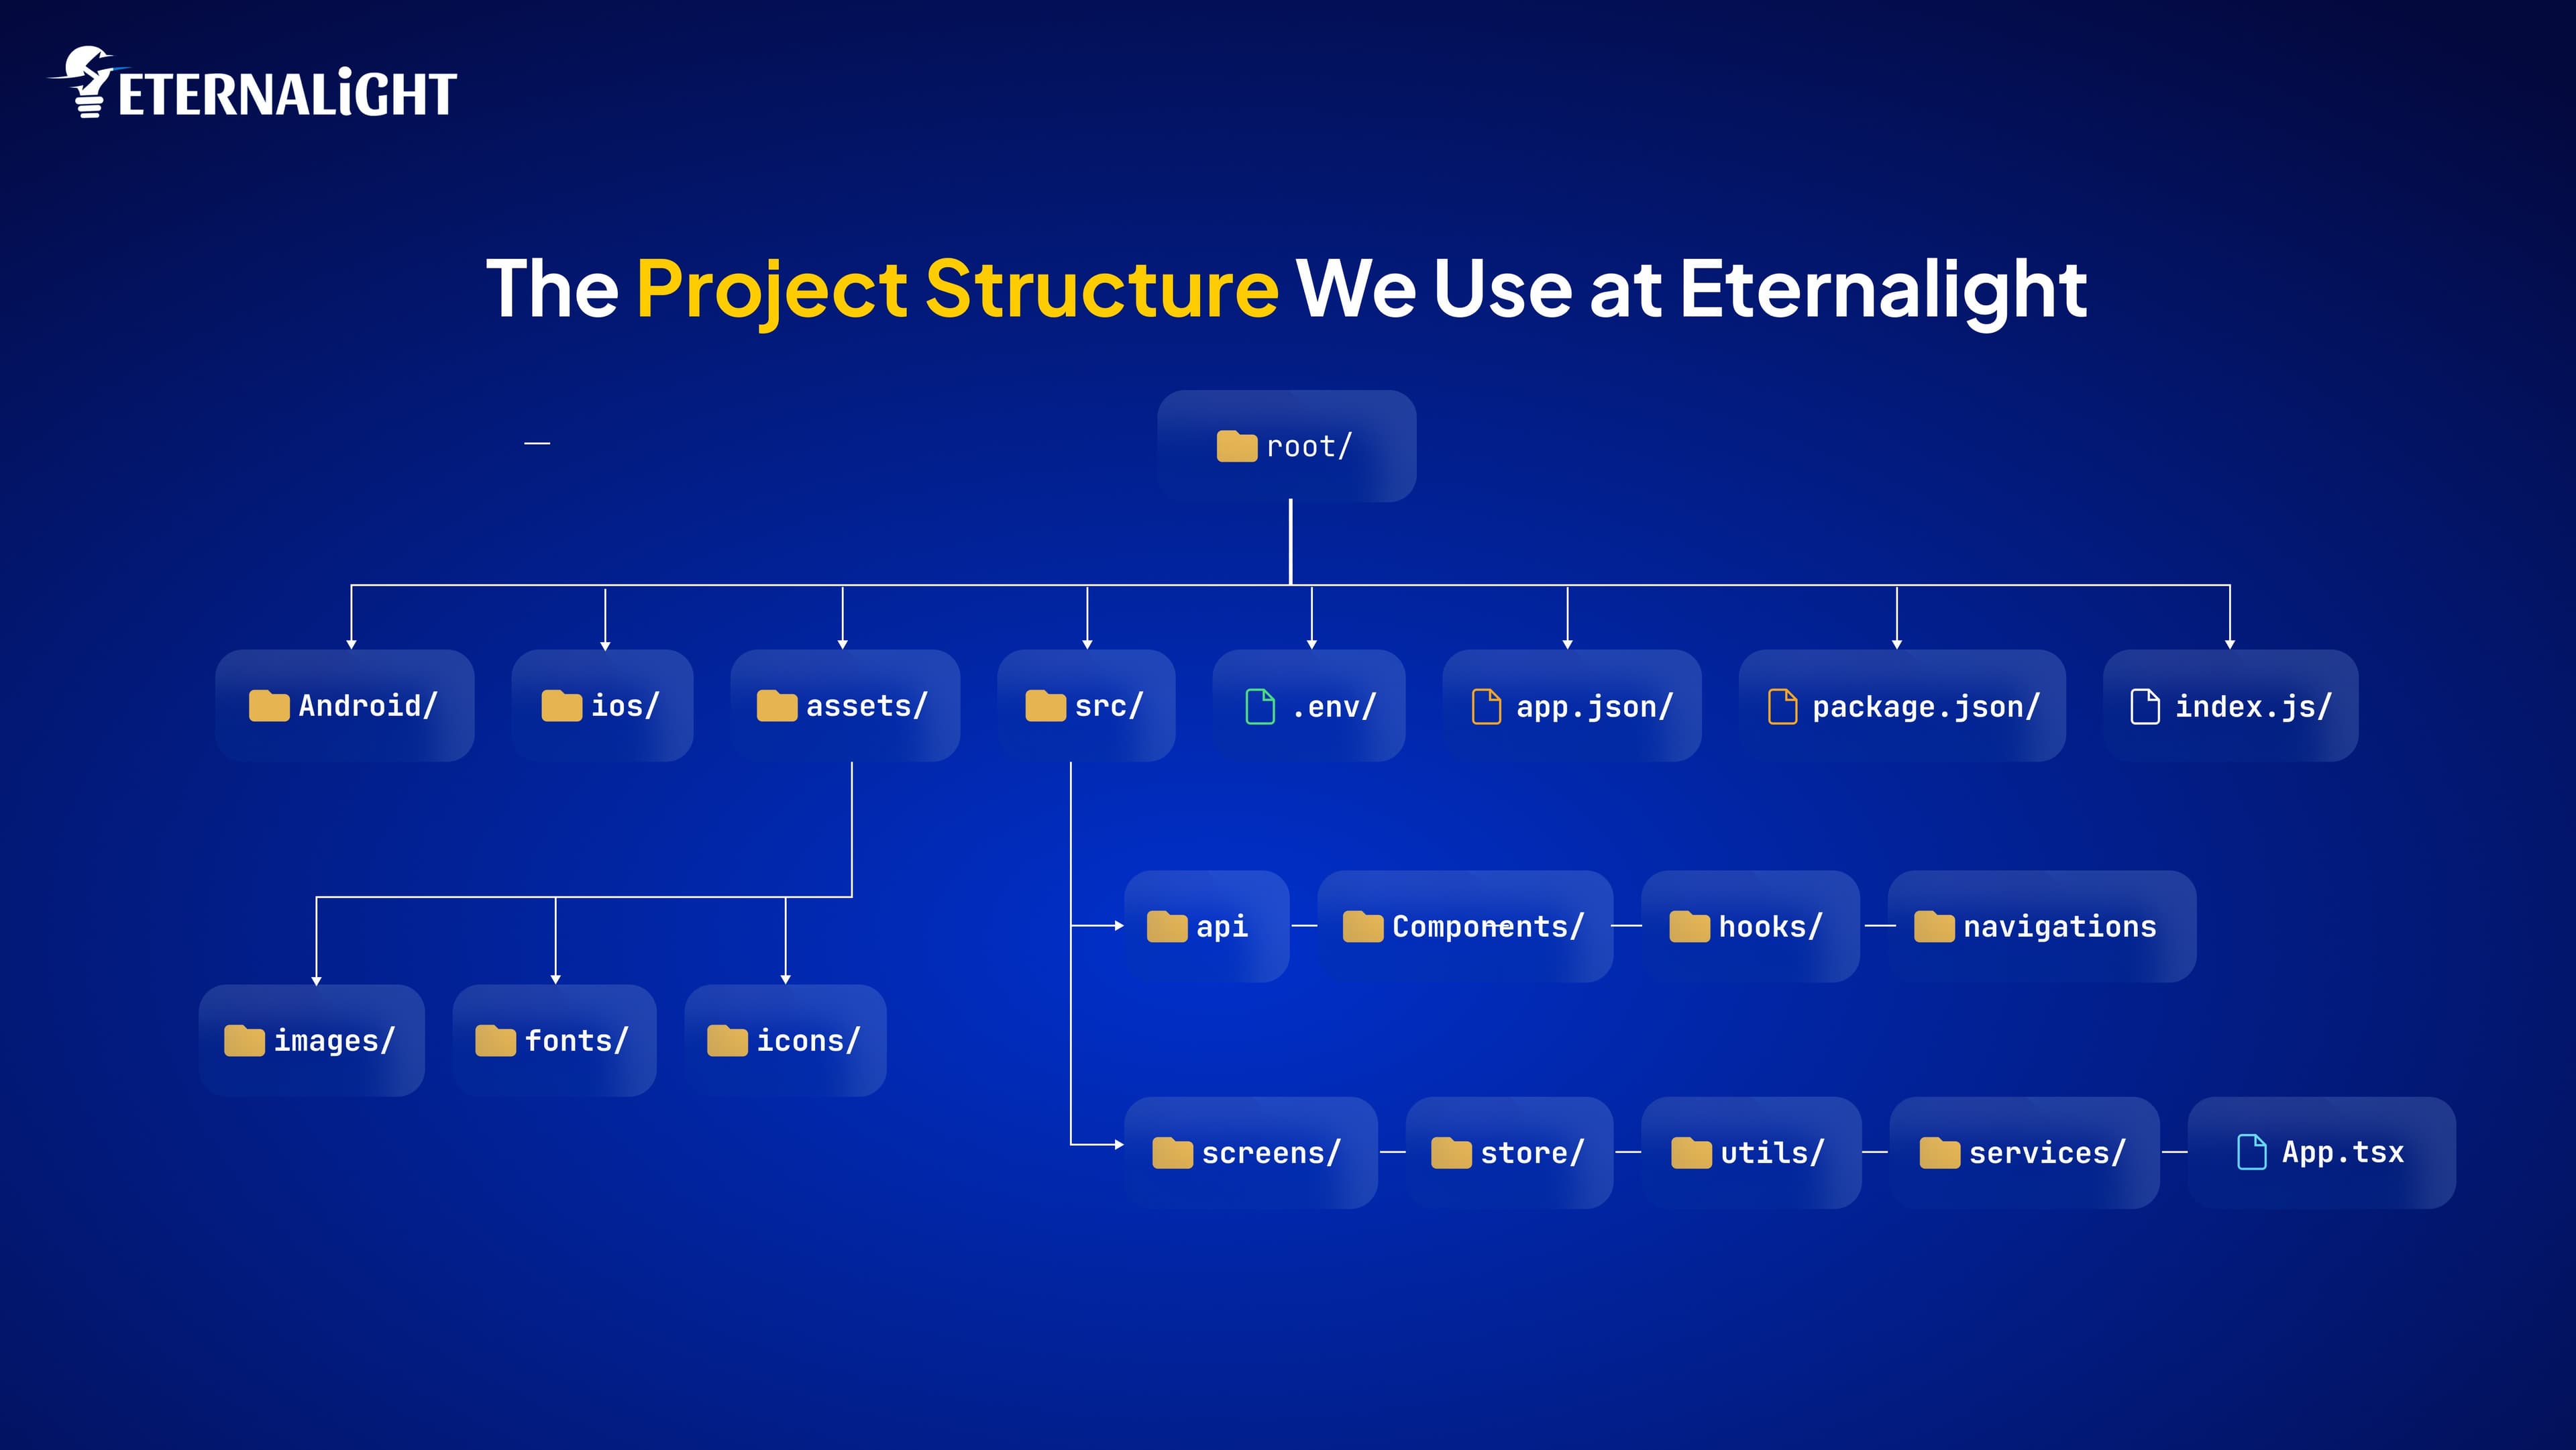
One thing we've learned while developing iOS and Android apps with React Native: structure matters. A messy root directory becomes a debugging nightmare. Over time, our go-to layout has stabilized into this:
Everything app-related stays inside src/ while native folders remain untouched.
Path Aliases (A Small Change That Keeps Imports Clean)
module.exports = {

  presets: ['module:metro-react-native-babel-preset'],

  plugins: [

    [

      'module-resolver',

      {

        root: ['./src'],

        alias: {

          '@components': './src/components',

          '@screens': './src/screens',

          '@api': './src/api',

          '@store': './src/store',

        },

      },

    ],

  ],

};
Packages We Install in Every React Native App Development Project
1. React Navigation
npm install @react-navigation/native

npm install react-native-screens react-native-safe-area-context

npm install @react-navigation/native-stack
2. State Management (Zustand / Redux Toolkit)
Zustand Example:
export const useUserStore = create(set => ({

  user: null,

  setUser: data => set({ user: data })

}));
Redux Toolkit Example:
const userSlice = createSlice({

  name: 'user',

  initialState: { data: null },

  reducers: {

    setUser: (state, action) => { state.data = action.payload; }

  }

});
3. TanStack Query (Highly Recommended)
npm install @tanstack/react-query4. Other Essentials
- Axios
- AsyncStorage
- Reanimated & Gesture Handler
- react-native-config
Part 2: Deployment, Keystore Setup, iOS Build Flow & CodePush Using React Native Tech Stack
It’s been a very challenging phase for many mobile app development teams who struggle during their first iOS app releases. However, we have discovered the way to deal with this. Here are the steps that have consistently worked for us, which may also work for your team.
Android Deployment & Keystore Setup
Create Your Release Keystore
keytool -genkeypair -v -storetype PKCS12 \

  -keystore my-release-key.keystore \

  -alias my-key-alias \

  -keyalg RSA -keysize 2048 -validity 10000

Move it into:

android/app/my-release-key.keystore
Add Credentials to gradle.properties
MYAPP_UPLOAD_STORE_FILE=my-release-key.keystore

MYAPP_UPLOAD_KEY_ALIAS=my-key-alias

MYAPP_UPLOAD_STORE_PASSWORD=your_store_password

MYAPP_UPLOAD_KEY_PASSWORD=your_key_password
Configure build.gradle
signingConfigs {

  release {

    storeFile file(MYAPP_UPLOAD_STORE_FILE)

    storePassword MYAPP_UPLOAD_STORE_PASSWORD

    keyAlias MYAPP_UPLOAD_KEY_ALIAS

    keyPassword MYAPP_UPLOAD_KEY_PASSWORD

  }

}
Generate the Release AAB
cd android
./gradlew bundleRelease
Upload the AAB to the Play Console.
iOS Deployment (The Flow That Rarely Breaks)
While using React Native for the iOS app phase is straightforward for those who regularly use it, it initially seems complicated to everyone. Our developers have followed this flow to drive consistency in our work and solve puzzle-like scenarios.
Open:
ios/YourApp.xcworkspaceChoose:
Any iOS Device (arm64)Then:
Product → Archive → Distribute App → App Store Connect → Upload
Next, need to update metadata, upload the screenshots, and privacy details in App Store Connect. Once done, we can hit submit for review.
Environment Variables Using react-native-config
To avoid any mihapps encounters and maintain cleanliness, that's what every react native app development team prefers:
.env

API_BASE_URL=https://api.example.com

Usage:

import Config from 'react-native-config';

api.get(`${Config.API_BASE_URL}/auth`);
Utilizing CodePush: Over-the-Air Updates
CodePush is one of the most underrated advantages of React Native. For UI fixes and small patches, it saves days of waiting for App Store review.
Install
npm install react-native-code-pushWrap the Root Component
import codePush from 'react-native-code-push';

const options = {

  checkFrequency: codePush.CheckFrequency.ON_APP_START,

};

export default codePush(options)(App);
Release an Update
appcenter codepush release-react -a <owner>/<app> -d ProductionHope this guide will help you to build iOS and Android app using React Native.
Final Thoughts
Most of the mobile products we’ve built at Eternalight Infotech follow a similar journey: fast iteration, controlled releases, and a need to support both iOS and Android without doubling the engineering footprint. React Native fits that mindset well. It matches the rhythm of web development and the pace of native app development, and also flexes the capabilities of robust shipping.
While choosing any techstack, don’t think only from a technical perspective, but be strategic. When we decided to use React Native to build iOS and Android apps, we researched across competitors and industry domain use cases and found that it suits well as a modest and technically fit.

Yash Maurya
Frontend Software Engineer
Focused on building clean, responsive, and accessible interfaces for web and mobile. Brings strong experience in React, Next.js, and state management, with additional backend exposure that helps in building well-aligned frontend solutions.
Related Blogs
 Software Development9 Mins
Why Choose Python for Fintech App Development?
Learn how Python helps fintech businesses build scalable, data-driven applications with powerful support for analytics, AI, APIs, and automation.
- Software Development8 Mins
Is It Time to Build Off the Self vs Custom Software for Your Business?
When should you build custom software? Learn the key signs, costs, limitations, and factors to consider before choosing custom software for your business.
- Software Development11 Mins
Website Security Checklist: What to Check Before It's Too Late
Worried about website security? Use this practical website security checklist to spot common risks and protect your website, data, and users.